 Pros: Strong, lightweight and easy to set up. Professional grade finish. Very smooth pan and tilt, and extremely stable and well balanced once you’ve found your gear’s centre of gravity. Excellent for photography (with long lenses or digiscoping), but also surprisingly effective for normal “scoping”. Competitive price for a top quality gimbal head, and Rob at Lensmaster has to get a mention here for customer service… which is top drawer.
Cons: If you’re not used to using a gimbal head the setup seems a bit “bulky” at first, but you soon get used to it. It would be nice to be able to “lock” both axis when you want to transport your gear (as it is you can tighten the vertical and horizontal knobs down quite a lot, but the equipment can still move around.
Price: GB£147.95 (RH-2 — standard mount) or GB£117.95 (RH-1 — side mount) + £9 P&P to Ireland direct from Lensmaster UK.
Rating: Highly Recommended
The Lensmaster Gimbal is high quality gimbal head that is ideal for long lens photography or digiscoping. It is solid, well made and affords the flexibility and benefits of a full gimbal head at a price that won’t break the bank. I was genuinely impressed with the smoothness of panning and tilting, and found the Lensmaster a joy to use both for digiscoping and for normal “scoping” — which is something I wasn’t expecting.
If you’re looking for a solid support for a heavy lens, or the ultimate flexibility for your digiscoping setup take a closer look at the Lensmaster gimbals… they’re superb.
What is a gimbal?
A gimbal is a tripod head designed to hold a heavy telephoto lens securely while still allowing the photographer complete freedom to track moving subjects like wildlife. Gimbals are also ideally suited to digiscoping (tele-photography through a spotting scope). With a gimbal the heavy lens is essentially rendered weightless, allowing you to point the camera / scope wherever you want, and even follow moving subjects with ease… and when you stop and let go, your camera stays pointing at exactly what you pointed it at until you decide to move it again.
The best way to “get” what a gimbal is all about is to see one in action… so here’s a Lensmaster demo video:
Lensmaster RH-2 Gimbal Full Review
 If you’ve tried your hand at wildlife photography or digiscoping then you don’t need me to tell you how vital solid support is. When you’re shooting at long focal lengths the magnification doesn’t just bring the subject closer, it also magnifies any shake or instability — and that can ruin your image.
So you need something to hold everything rock-steady. The problem with that is that most wildlife doesn’t stay very still. While you need a solid, steady support, you also need freedom to move at a moment’s notice, whether it’s to follow a moving subject (like a bird in flight) or to shift quickly to some unexpected “action”.
In these situations a gimbal head really comes into its own.
I don’t currently own a lens large enough to warrant a gimbal head, but since I started using a top quality spotting scope I have been getting more interested in digiscoping… or using the scope as a super-telephoto camera lens. I was intrigued to see how the Lensmaster RH-2 would perform, both as a dedicated digiscoping head, but also as a head for standard viewing through the scope.
First impressions
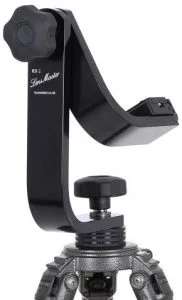
The RH-2 from its packaging it looks and feels like a solid, well constructed piece of kit, and the finish is very good too. It’s hand made in the UK from aircraft grade aluminium, so despite being very strong, it’s also relatively light, given its size and the job it’s designed to do. The whole head weighs in at just 1.21 kg.
The head comes with an Arca Swiss” style clamp and two Arca Swiss style plates… one 50mm plate and one 140mm long to allow more latitude to balance your equipment. A 1/4″ to 3/8″ thread adapter is also included in case you need one to attach the gimbal to your tripod.
Setting up
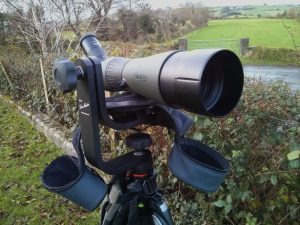
 Setting up the Lensmaster was really easy… in fact the hardest part was getting the head off my Vanguard ABEO Pro 283CGH carbon fibre tripod. The Lensmaster simply screwed onto the tripod in it’s place and voila… it was ready to go.
Attaching your equipment
The idea of a gimbal is that you balance your equipment’s centre of gravity and the whole set up is perfectly balanced. Just screw one of the supplied Arca Swiss Style lens plates onto your lens or scope (or your camera body for shorter / lighter lenses). You then slot the plate into the clamp on the gimbal base plate and partially tighten the clamp. With the vertical friction control loosened to allow free movement slide your camera or digiscoping set up back and forth until it doesn’t tilt forward or backward when you let go.
That’s all there is to it. Tighten the clamp to lock your equipment in place and you’re ready to go. Now no matter where you point your camera or scope it will stay there.
Using the gimbal
Using a gimbal in the field takes a little bit of getting used to… at first it feels a little odd… but it’s something you get used to quickly. I was amazed at how fluid the movement in the RH-2 was, and yet how steady the image through the scope remained. It really was rock solid, but with beautifully smooth movement on both axes, and the scope just stayed where you pointed it. I’d been keen to try out a gimbal for digiscoping, but what I hadn’t been expecting was just how good it would prove for using a scope in the normal way… for looking at wildlife.
Ideal for digiscoping… and observation
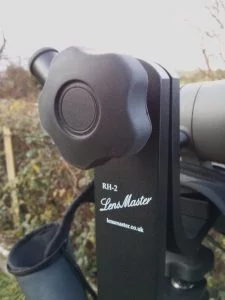
The gimbal is really easy to use. Once your equipment is balanced on the plate, you just adjust the tension for the horizontal (pan) and vertical (tilt) axes using the two soft-touch rubber-coated knobs, then just point the scope / camera where you want it… and it stays there… effortlessly. I used the RH-2 on one of our Discover Wildlife Weekends during the review period and it was brilliant for finding wildlife and showing it to other people. You really could just move the scope in any direction and then just step away from it for someone else to take a look, knowing it was going to stay pointing at whatever it was you were looking at when you let go.
The setup really comes into its own for digiscoping though. With an SLR attached via a digiscoping adapter on the eyepiece end of the scope you need to adjust the centre of gravity by sliding the scope forward a little in the Arca Swiss clamp to allow for the weight of the camera, but the plate provided provides ample scope (pardon the pun) to do that without issue. It’s quick and easy.
With the camera attached I could track moving subjects with ease just by moving the camera. Remember when you’re digiscoping you focus manually using the scope, so to focus and shoot photographs at the same time you need two hands. With a ball head or pan head you’d need a hand to operate the head, another to focus the scope and another to fire the shutter — the maths and anatomy equation simply doesn’t add up. With the gimbal though you can use one hand to move and operate the camera / scope setup, and the other to focus the scope… no problem. It works really well.
Simplicity over complexity
Instead of complicated sealed units to house the moving parts (which makes industry-leading models expensive and means you can’t service them yourself), the Lensmaster takes a different approach. It’s really easy to strip down by simply unscrewing the adjustment knobs all the way out. In fact the manufacturer claims the whole unit can be disassembled in seconds for cleaning, and while I haven’t had a need to do so yet, there’s no reason to doubt that claim. So if sand and dirt does get into the mechanism, it’s very straightforward to strip your gimbal down, rinse the parts in soapy water, add a blob of grease to the bearings and reassemble the whole thing, good as new. Being able to strip the gimbal down easily is also a boon for the travelling photographer, as it makes it easy to pack the various parts in a tight space if you’re travelling light.
NB. if weight / size is an issue Lensmaster makes a smaller “Traveller” model of the gimbal specifically for travelling photographers. You’ll find details on the Lensmaster website
Specification
Height 250mm – 9 3/4″
Width 220mm – 8 3/4″
Deep 60mm – 2 1/4″
Weight – 1.21 kg – 2lb.11oz
All sizes approx.
Conclusion
The Lensmaster RH-2 gimbal is a very capable, well made head that is a joy to use. I still have a little way to go in my digiscoping evolution before I secure those killer “Bird in Flight” shots… but one thing’s for sure, a gimbal is going to be part of the digiscoping equation, and I really don’t think I need to look much further than the Lensmaster RH-2. I can’t wait to give it a try with a long telephoto lens, but have no doubt that it will come through with flying colours.
One other thing worthy of note here is the customer service… Rob at Lensmaster is very approachable and happy to answer questions, and while the Lensmaster was so simple to use I didn’t really have any to ask, Rob’s professional and helpful approach made dealing with him a pleasure.
If you’re looking for a sturdy, versatile head to support a long lens, your digiscoping setup or your spotting scope I’d certainly recommend taking a look at the Lensmaster Gimbal.
Acknowledgements
I’d like to thank Lensmaster for submitting the RH-2 Gimbal for review on Ireland’s Wildlife.
NB. Ireland’s Wildlife has no specific affiliation to any optics or gear manufacturer and all reviews on the site are completely independent and objective. If you’re an optics or gear manufacturer and would like to submit your wildlife related product for review on the site please drop us a line using the contact form and we can take things from there.


4 comments
Photographers Without Borders
hi
how can i buy The LensMaster Gimbal i want one please
Calvin Jones
Thanks for the comment — you can buy the Lensmaster Gimbal Head direct from the UK based manufacturer here.
Yeshwanth L
Is it as stable as Wimberley wh 200 v2
Calvin Jones
I’ve never used the Wimberley so couldn’t say, but the Lensmaster is very solid and stable. I’ve spoken to others who have used both, and the consensus seems to be that both are great, but the Wimberley is that bit smoother and more fluid (but then it’s also substantially more expensive).